At ReactConf 2019, the React team announced an experimental branch of React that includes support for Concurrent React. This is a long awaited mode that allows React to speculatively render UI in memory before actually committing to it. This was coupled with an announcement for Suspense, a tool that allows us to defer full rendering of a component.
The key advantage of this is it allows components to say “Hey, I’m not actually ready to be rendered yet, can you give me a few seconds?” At this point, the React renderer can decide to put off displaying new UI entirely, leaving the page as is, or show some fallback UI. This is particularly useful when clicking a link to change to a page that has heavy data requirements.
However, the real game-changer is not just in being able to speculatively render. It’s in being able to coordinate unrelated data-sources to create a pleasing user loading experience, that is predictable and controlled.
Important warning!
Everything in this article is still highly experimental. The APIs used are not
ready for production use, and may change quickly. This is based on my own
experiments with the features. This article might be out of date by the time
you read it!
Keep up to date on the official React blog
.
.
A quick example of Concurrent React
In synchronous (read: “normal”) React, when we change page, we have to render everything on the page as it is. After this, we commit it to the DOM and show it in the web browser. Remember that in React, rendering just means “calculate what we can show on the screen”, but doesn’t actually mean making it visible yet.
Usually if some User component requires data, such as showing a user’s profile, it is at this point it will try to gather it from the network. It will show a loading spinner, and wait for the network to respond before deciding to show the data. This is known as “fetch-on-render”.
In Concurrent mode, when we change page, we still render everything on the page — but importantly, React can choose to not commit that to the DOM yet. Our component that needs data will ask for the data. If it’s already loaded, great! We’ll render the component, and commit to DOM.
If we don’t have the data, we’ll still kick off a network request there (still “fetch-on-render” here[1]), but instead of choosing to show a loading spinner here, it will shout upwards up the React component stack, saying, “Hey! I’m not ready to render yet! Give me some time!”
React has a choice here. If inside a transition, as set up by the useTransition hook, React can choose to delay changing anything visually until the component says it’s ready to render. If a <Suspense fallback={<div>Loading...</div>}> boundary is provided above the component, React can show that boundary instead. Even smarter though — React can wait just a little bit before trying to render our User component again. If that fails, THEN show the fallback loader. This stops us eagerly showing a spinner, which would look bad if we only had to show it for a short time, say 200ms!
.
It sounds like all we’ve done is moved where a loading spinner is shown? ⏳
Yes, but also so much more.
We’ve not just decoupled the loading spinner from the component, we’ve decoupled the entire concept of loading from the component. Our User component no longer has to care if or how the data is ready — it simply says “I’m going to try using some data. If it’s not ready, I’ll let everyone know.”
This means that other components are now free to do the same thing. Rather than show spinners, they simply say they’re not ready. This lets us write our UIs so that it properly coordinates loading states in a way that’s more pleasing to users. Consider the following two scenarios.
In both scenarios, imagine the data comes in from the network in the same order — seemingly random. In both cases, we’re going to use the “Render-as-You-Fetch” pattern — load data as soon as possible, and render component fallbacks where we don’t have data yet.
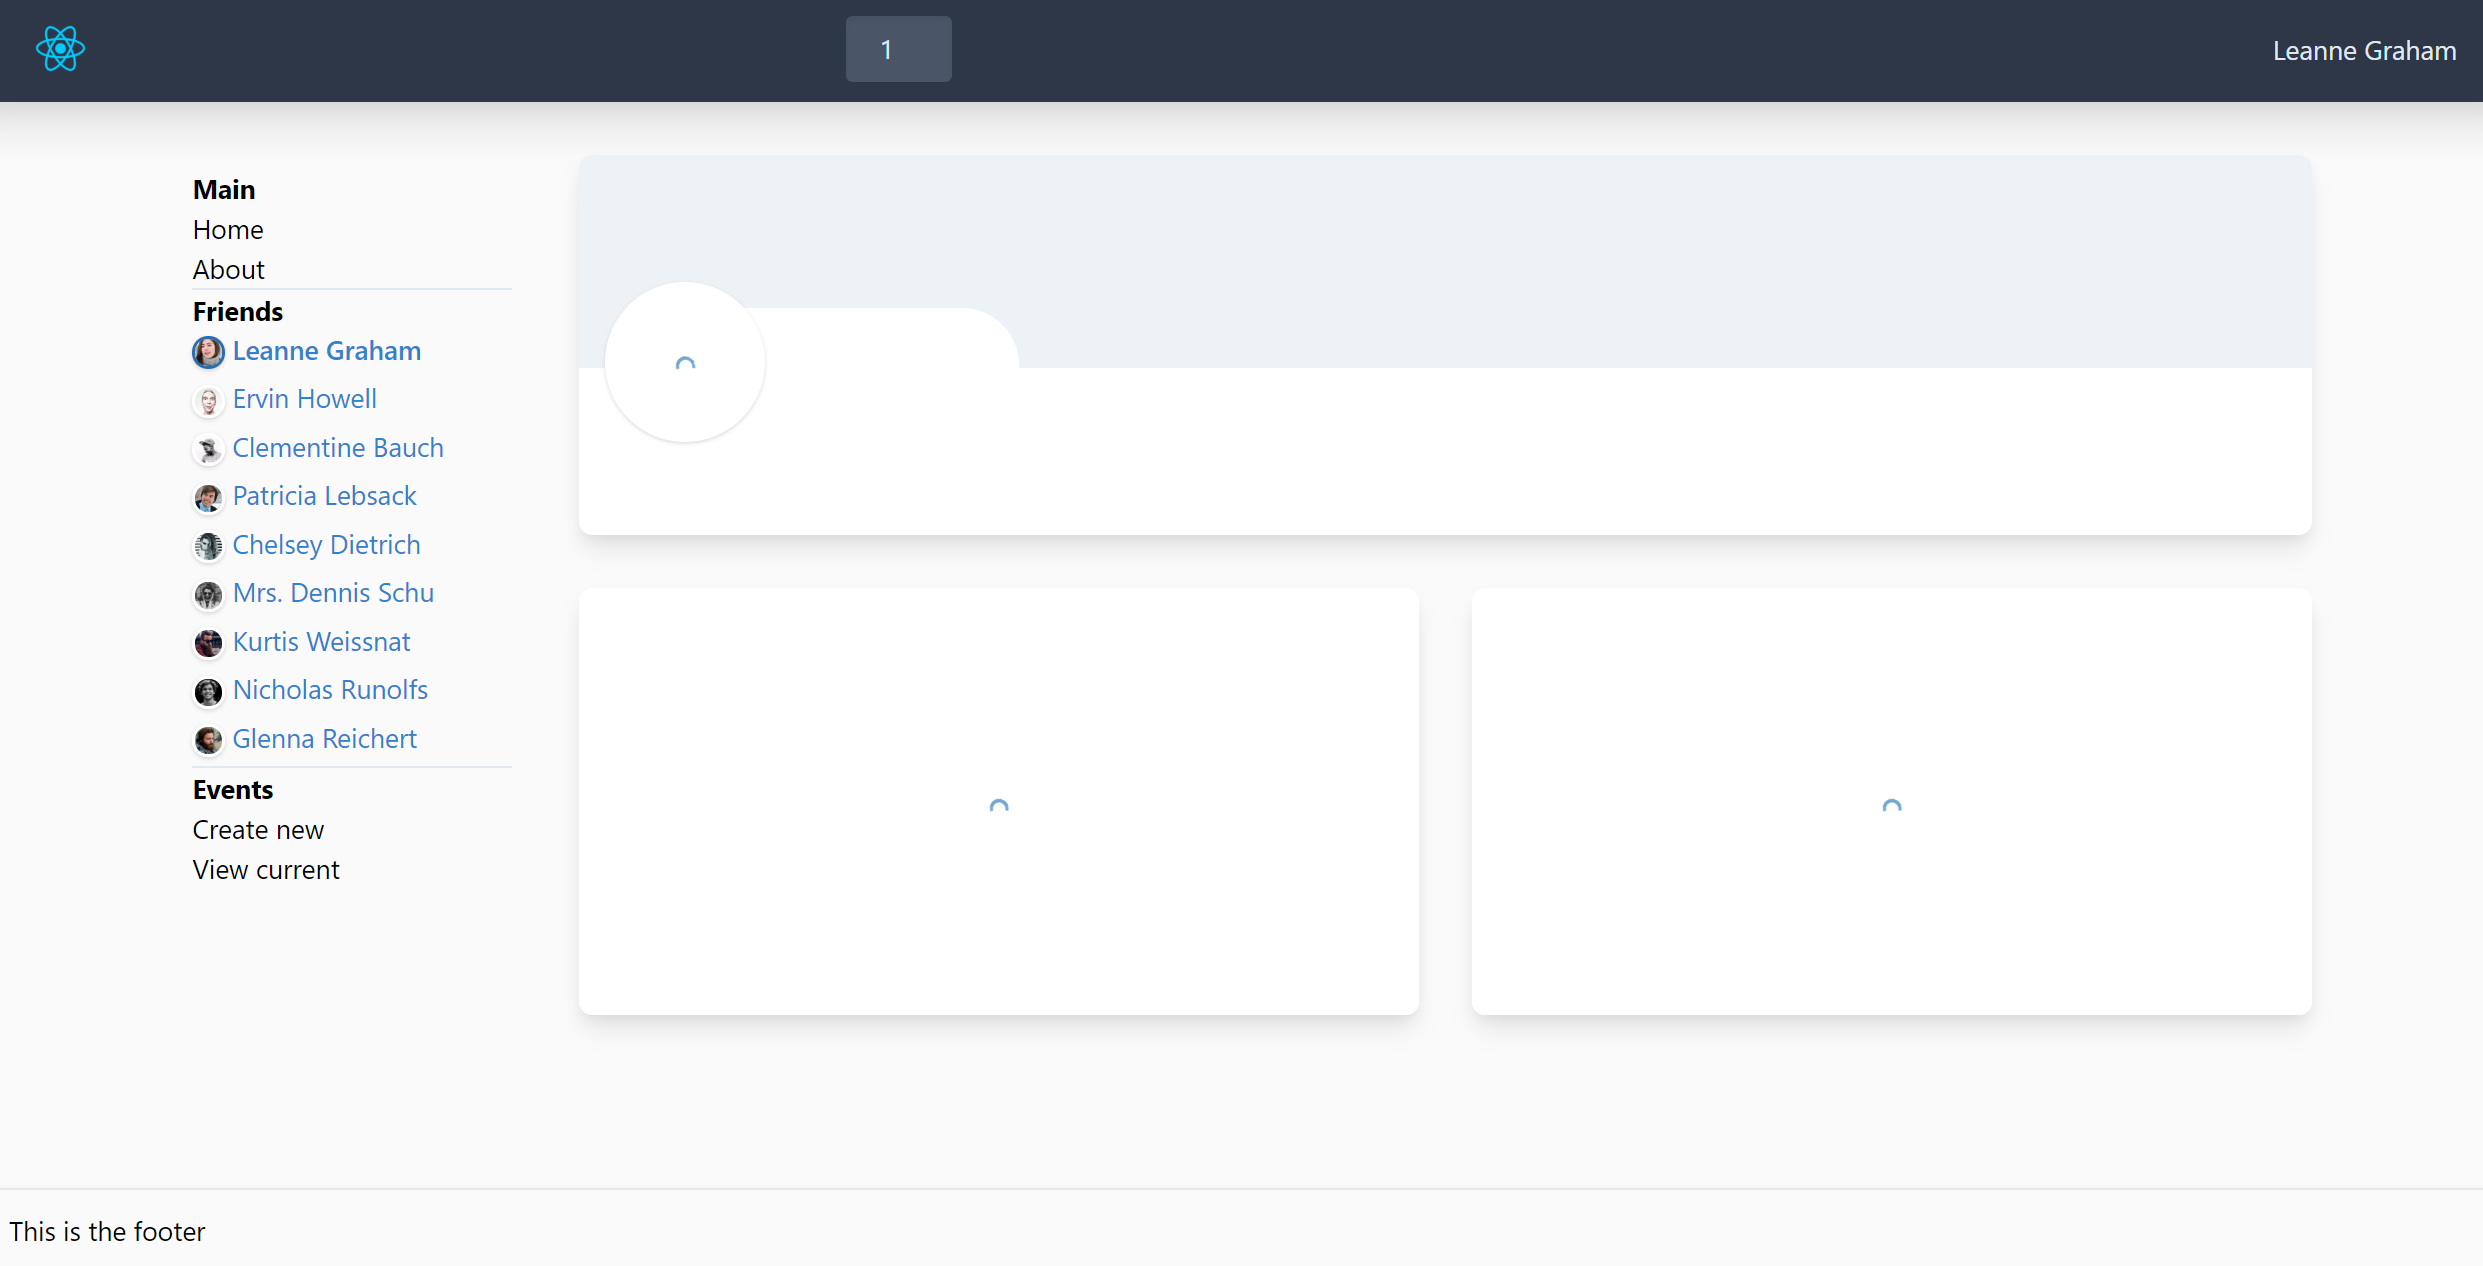
Let’s load up a webpage. It’s called “FriendViewer”, and it lets us see posts that our friends have written and shared with the world.
Upon going to the website, this is the very first thing we see:
Wow — there’s a lot to take in here. With components managing their own data loading, I can count 5 different “Loading” states here!
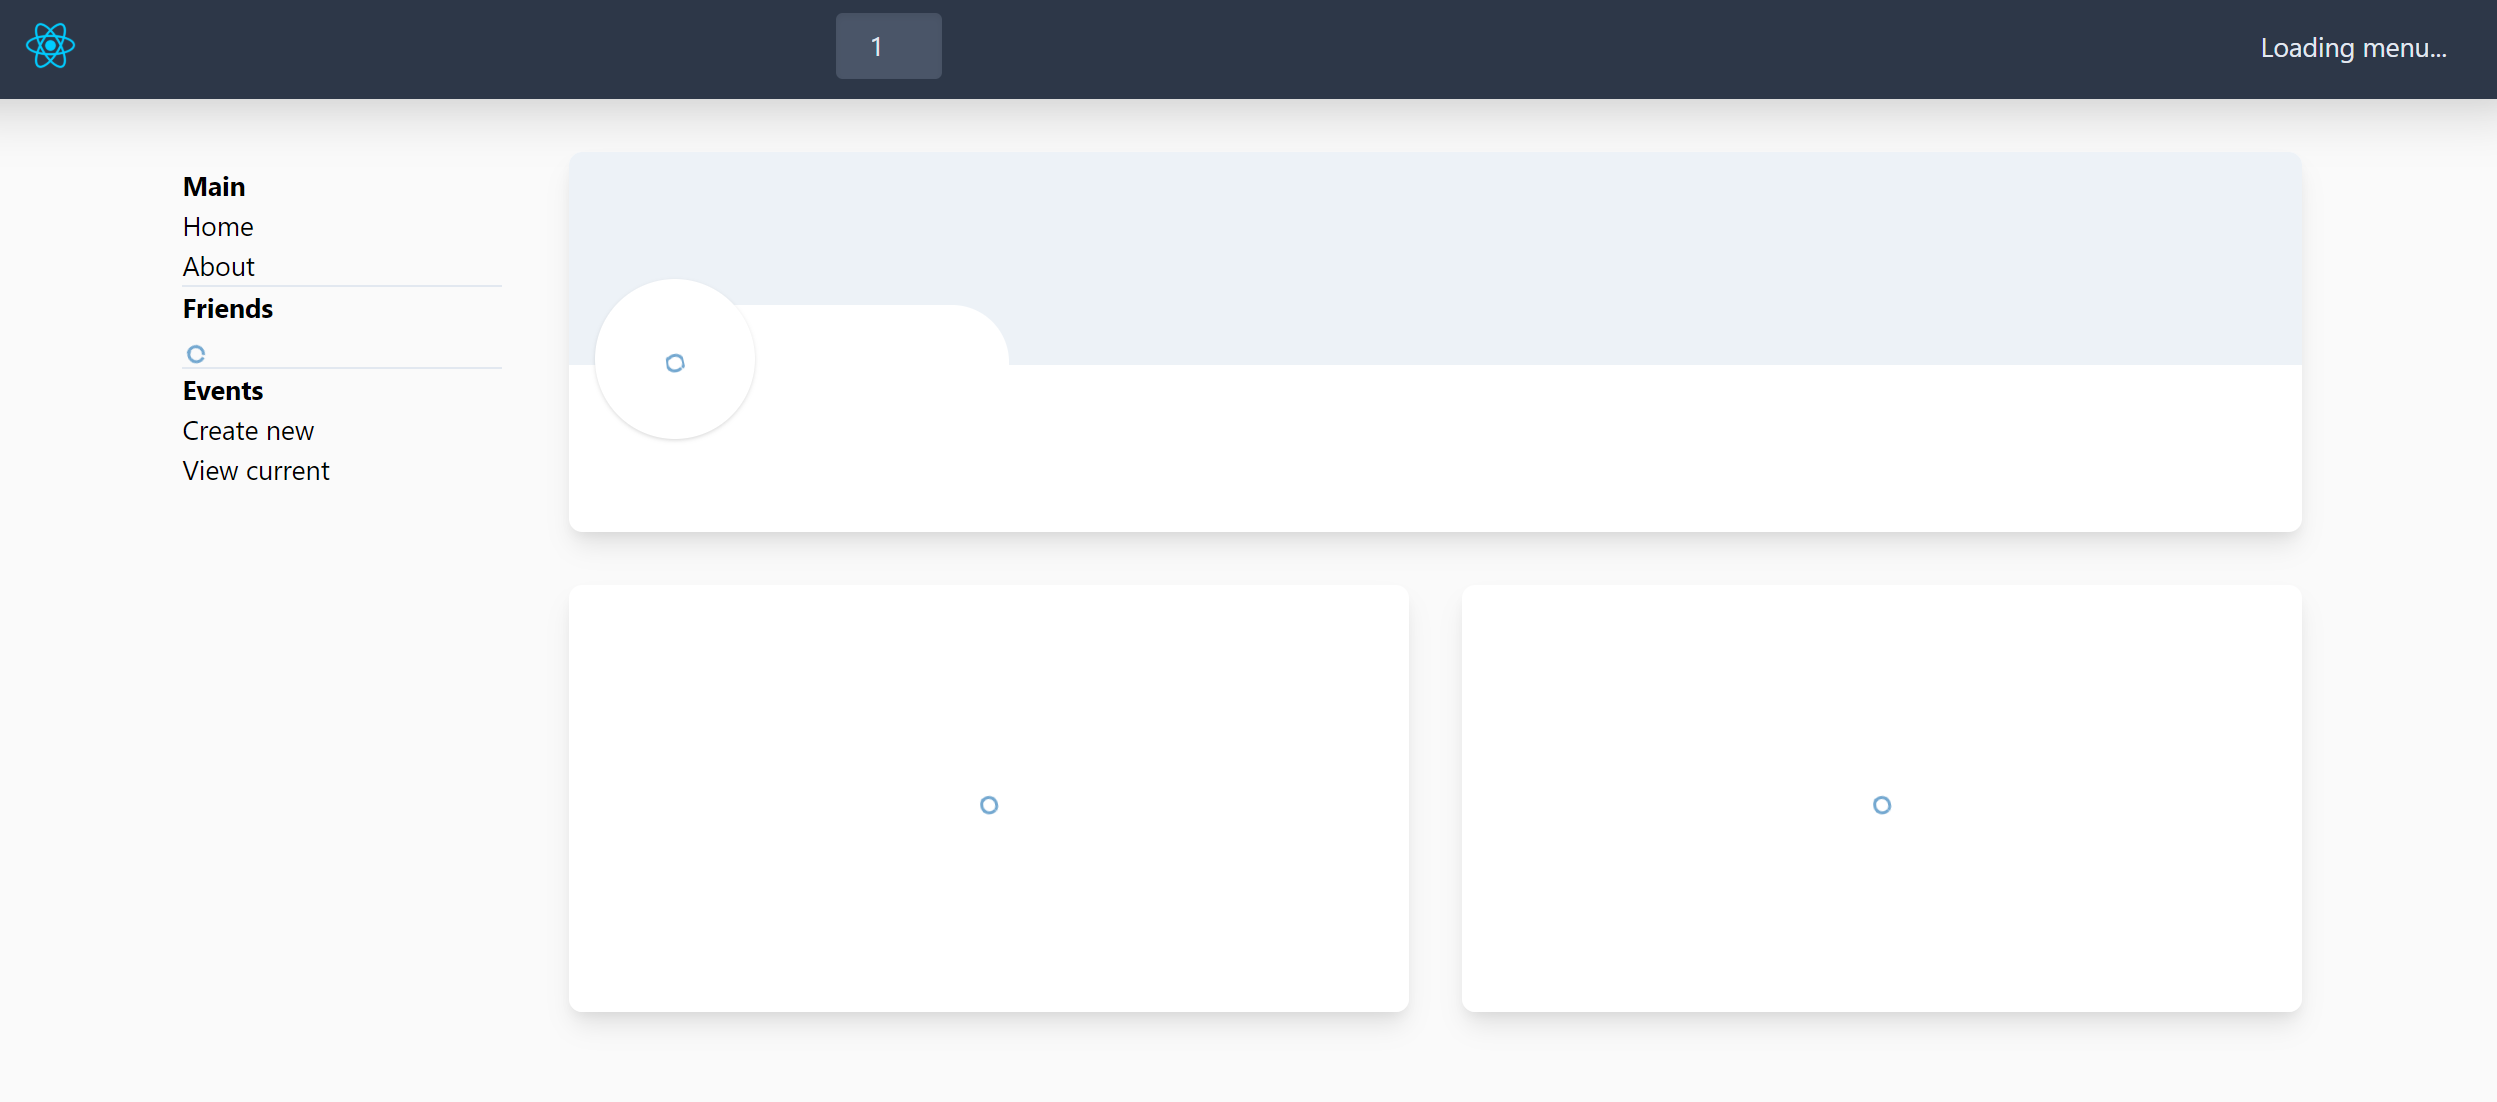
After a while, data starts coming in from the network, in a random order.
Oh no, the data has come in in an unexpected order.
This is going to pop all over the place. In particular, notice how the bar on the left looks like it might resize when “Friends” come back in. This means the end-user might try clicking a link below, like “Create new event”, and instead click something else.
This is just a poor user experience.
Here we’re going to carefully coordinate the order and position of all loading states. The data will still come back to the React app in an unpredictable order, but we will display them in a predictable manner.
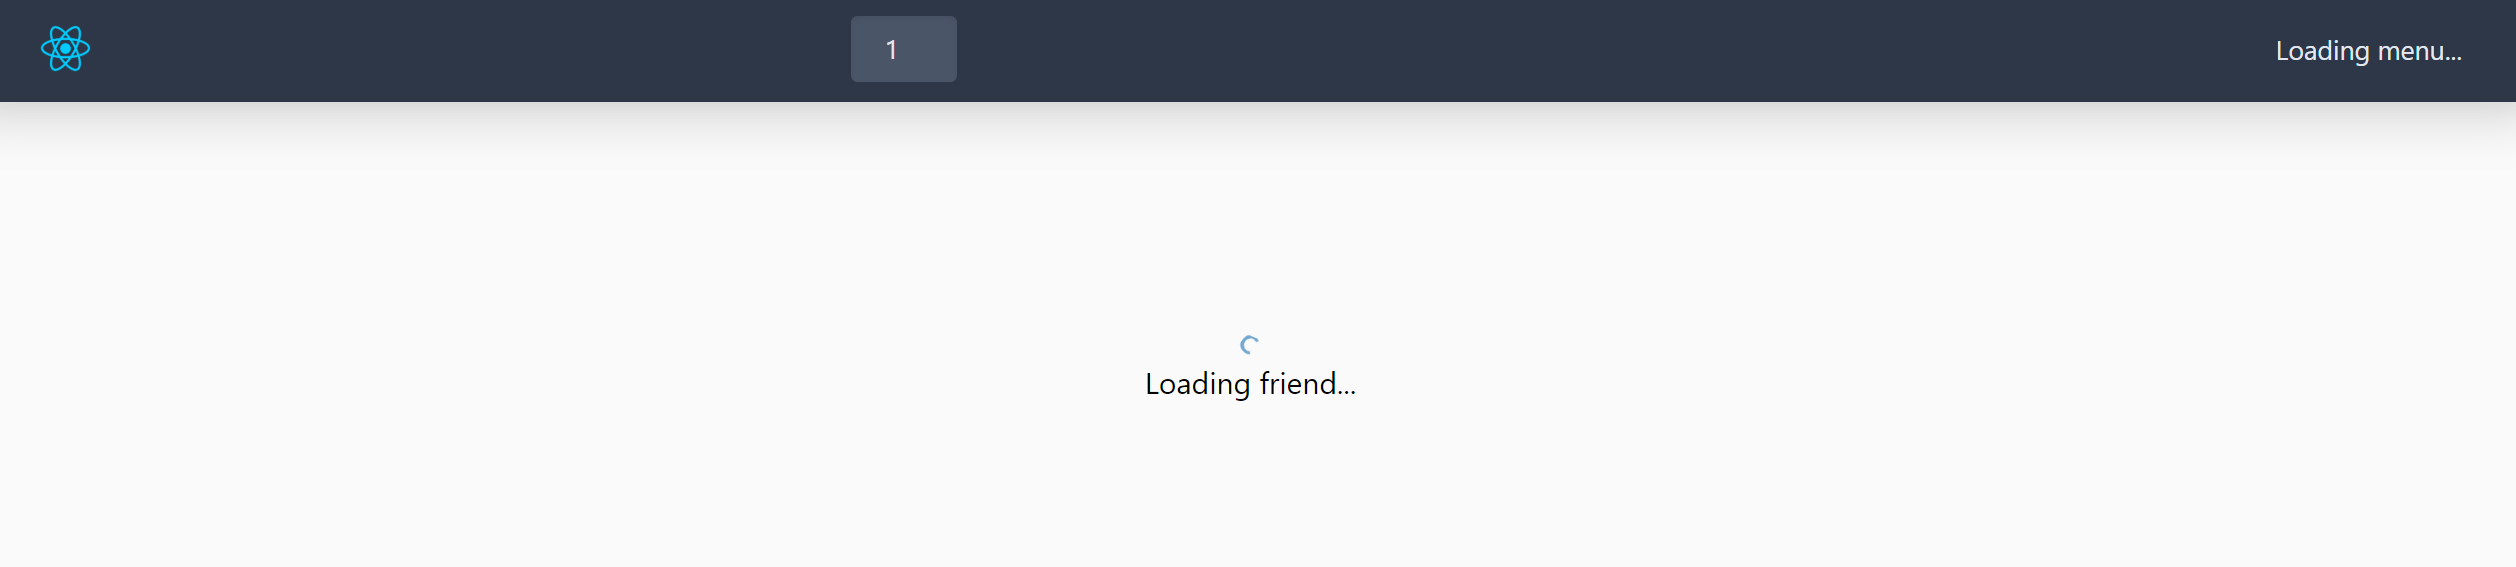
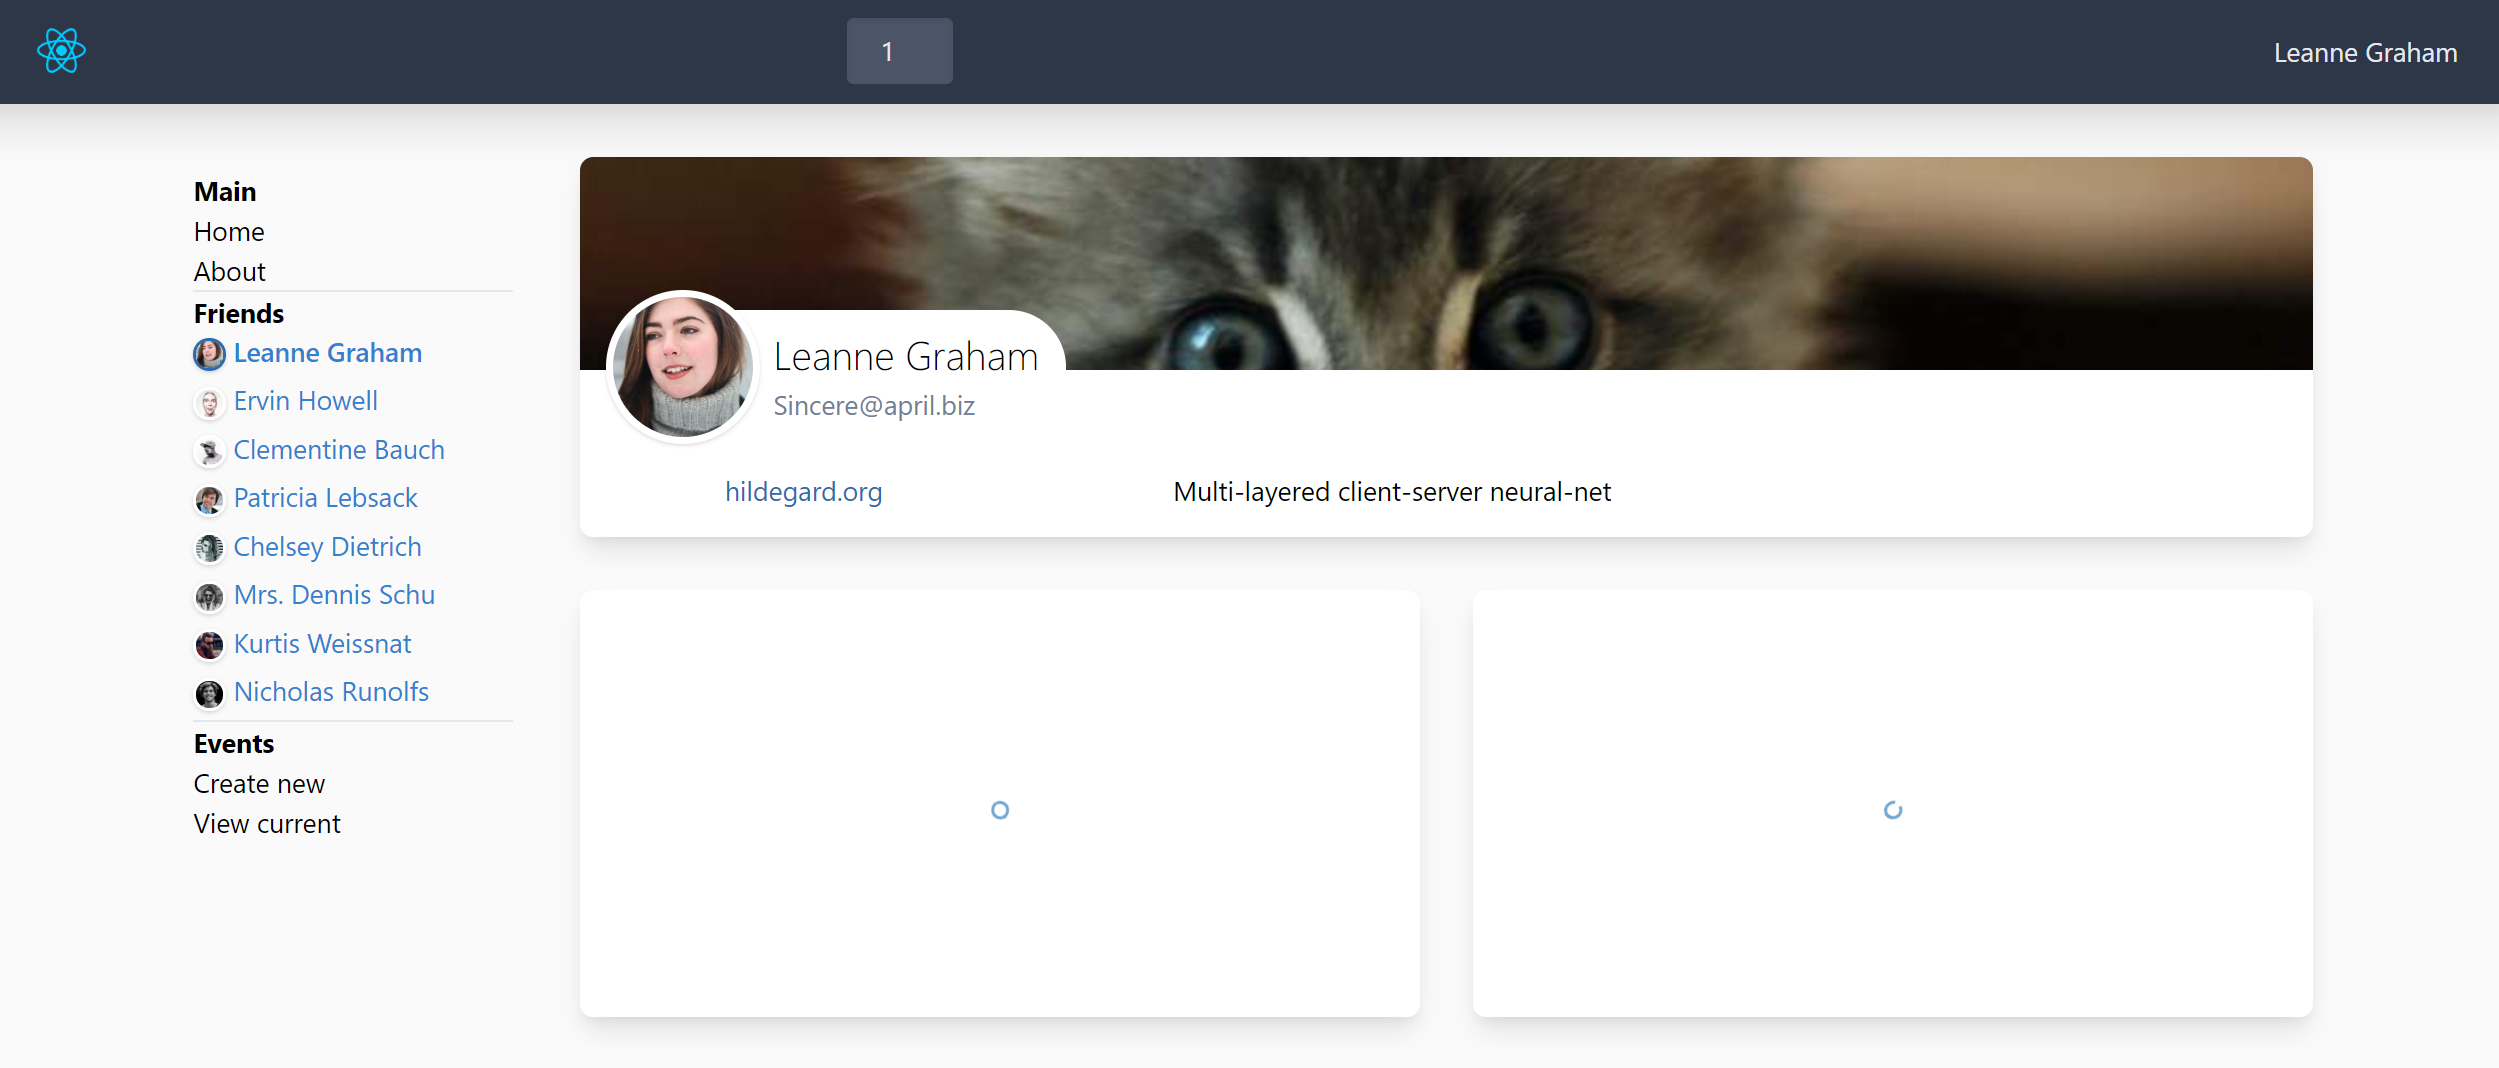
The end user has just opened the website. Immediately we can provide feedback: We’re getting things ready!
Very quickly we know exactly who we’re going to see the page of.
Remember that spinner for the friends list on the left? We’ve completely got rid of it. No more popping and shifting of buttons we might want to click.
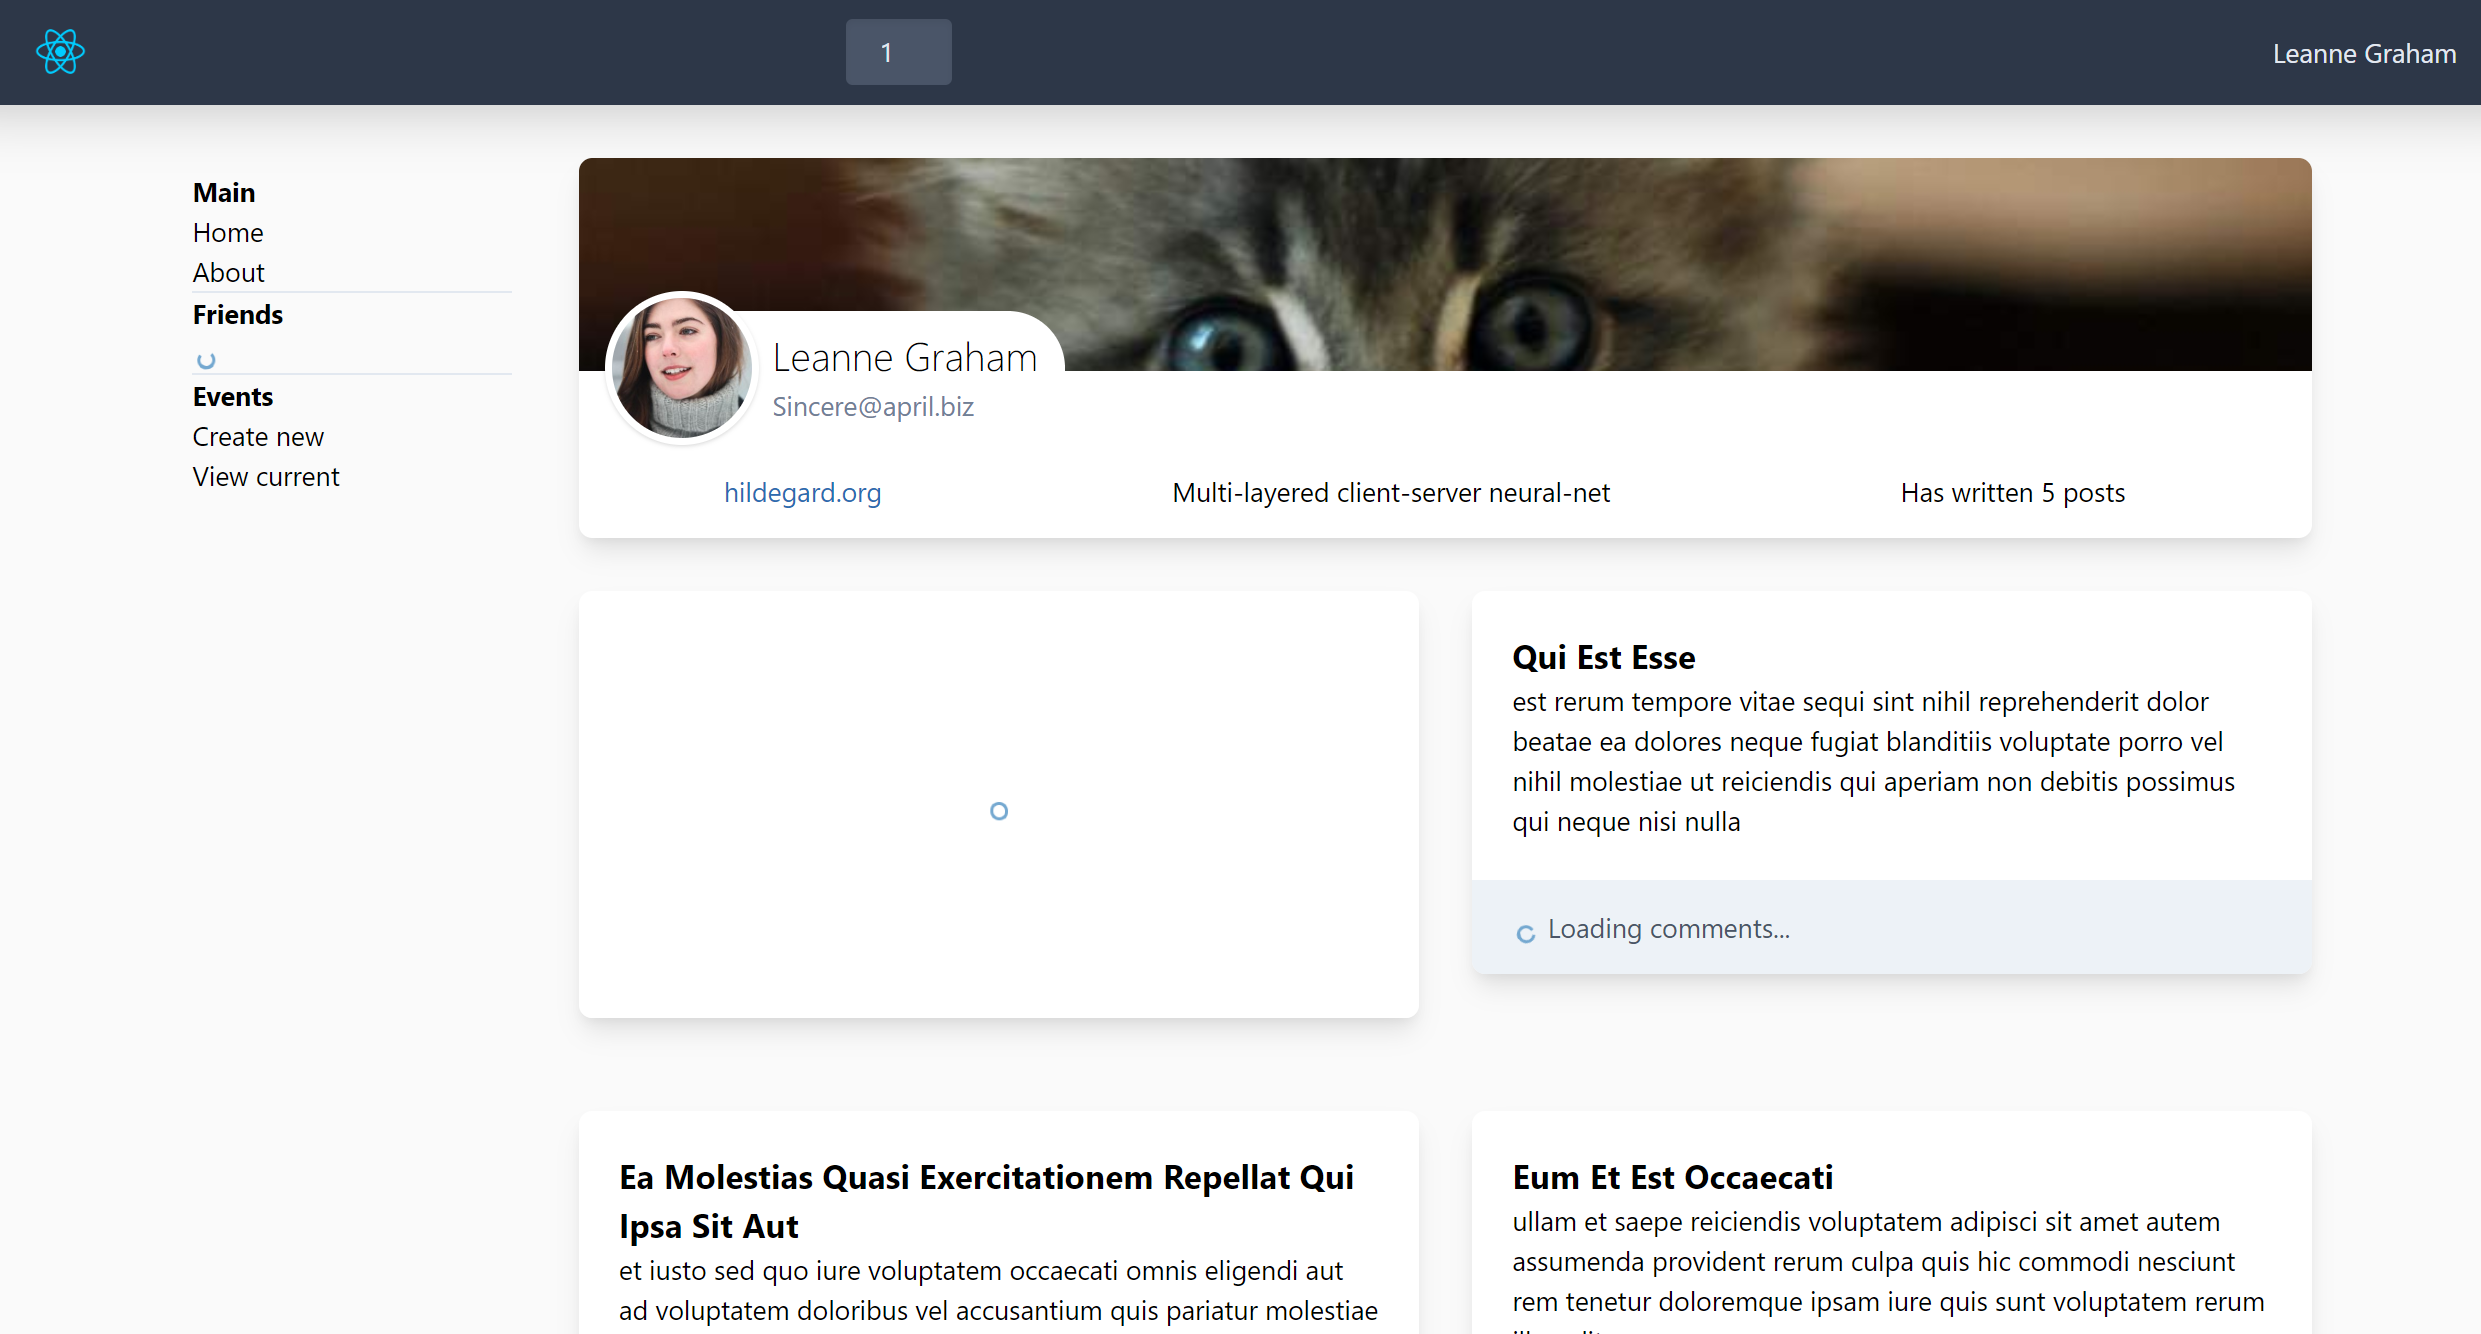
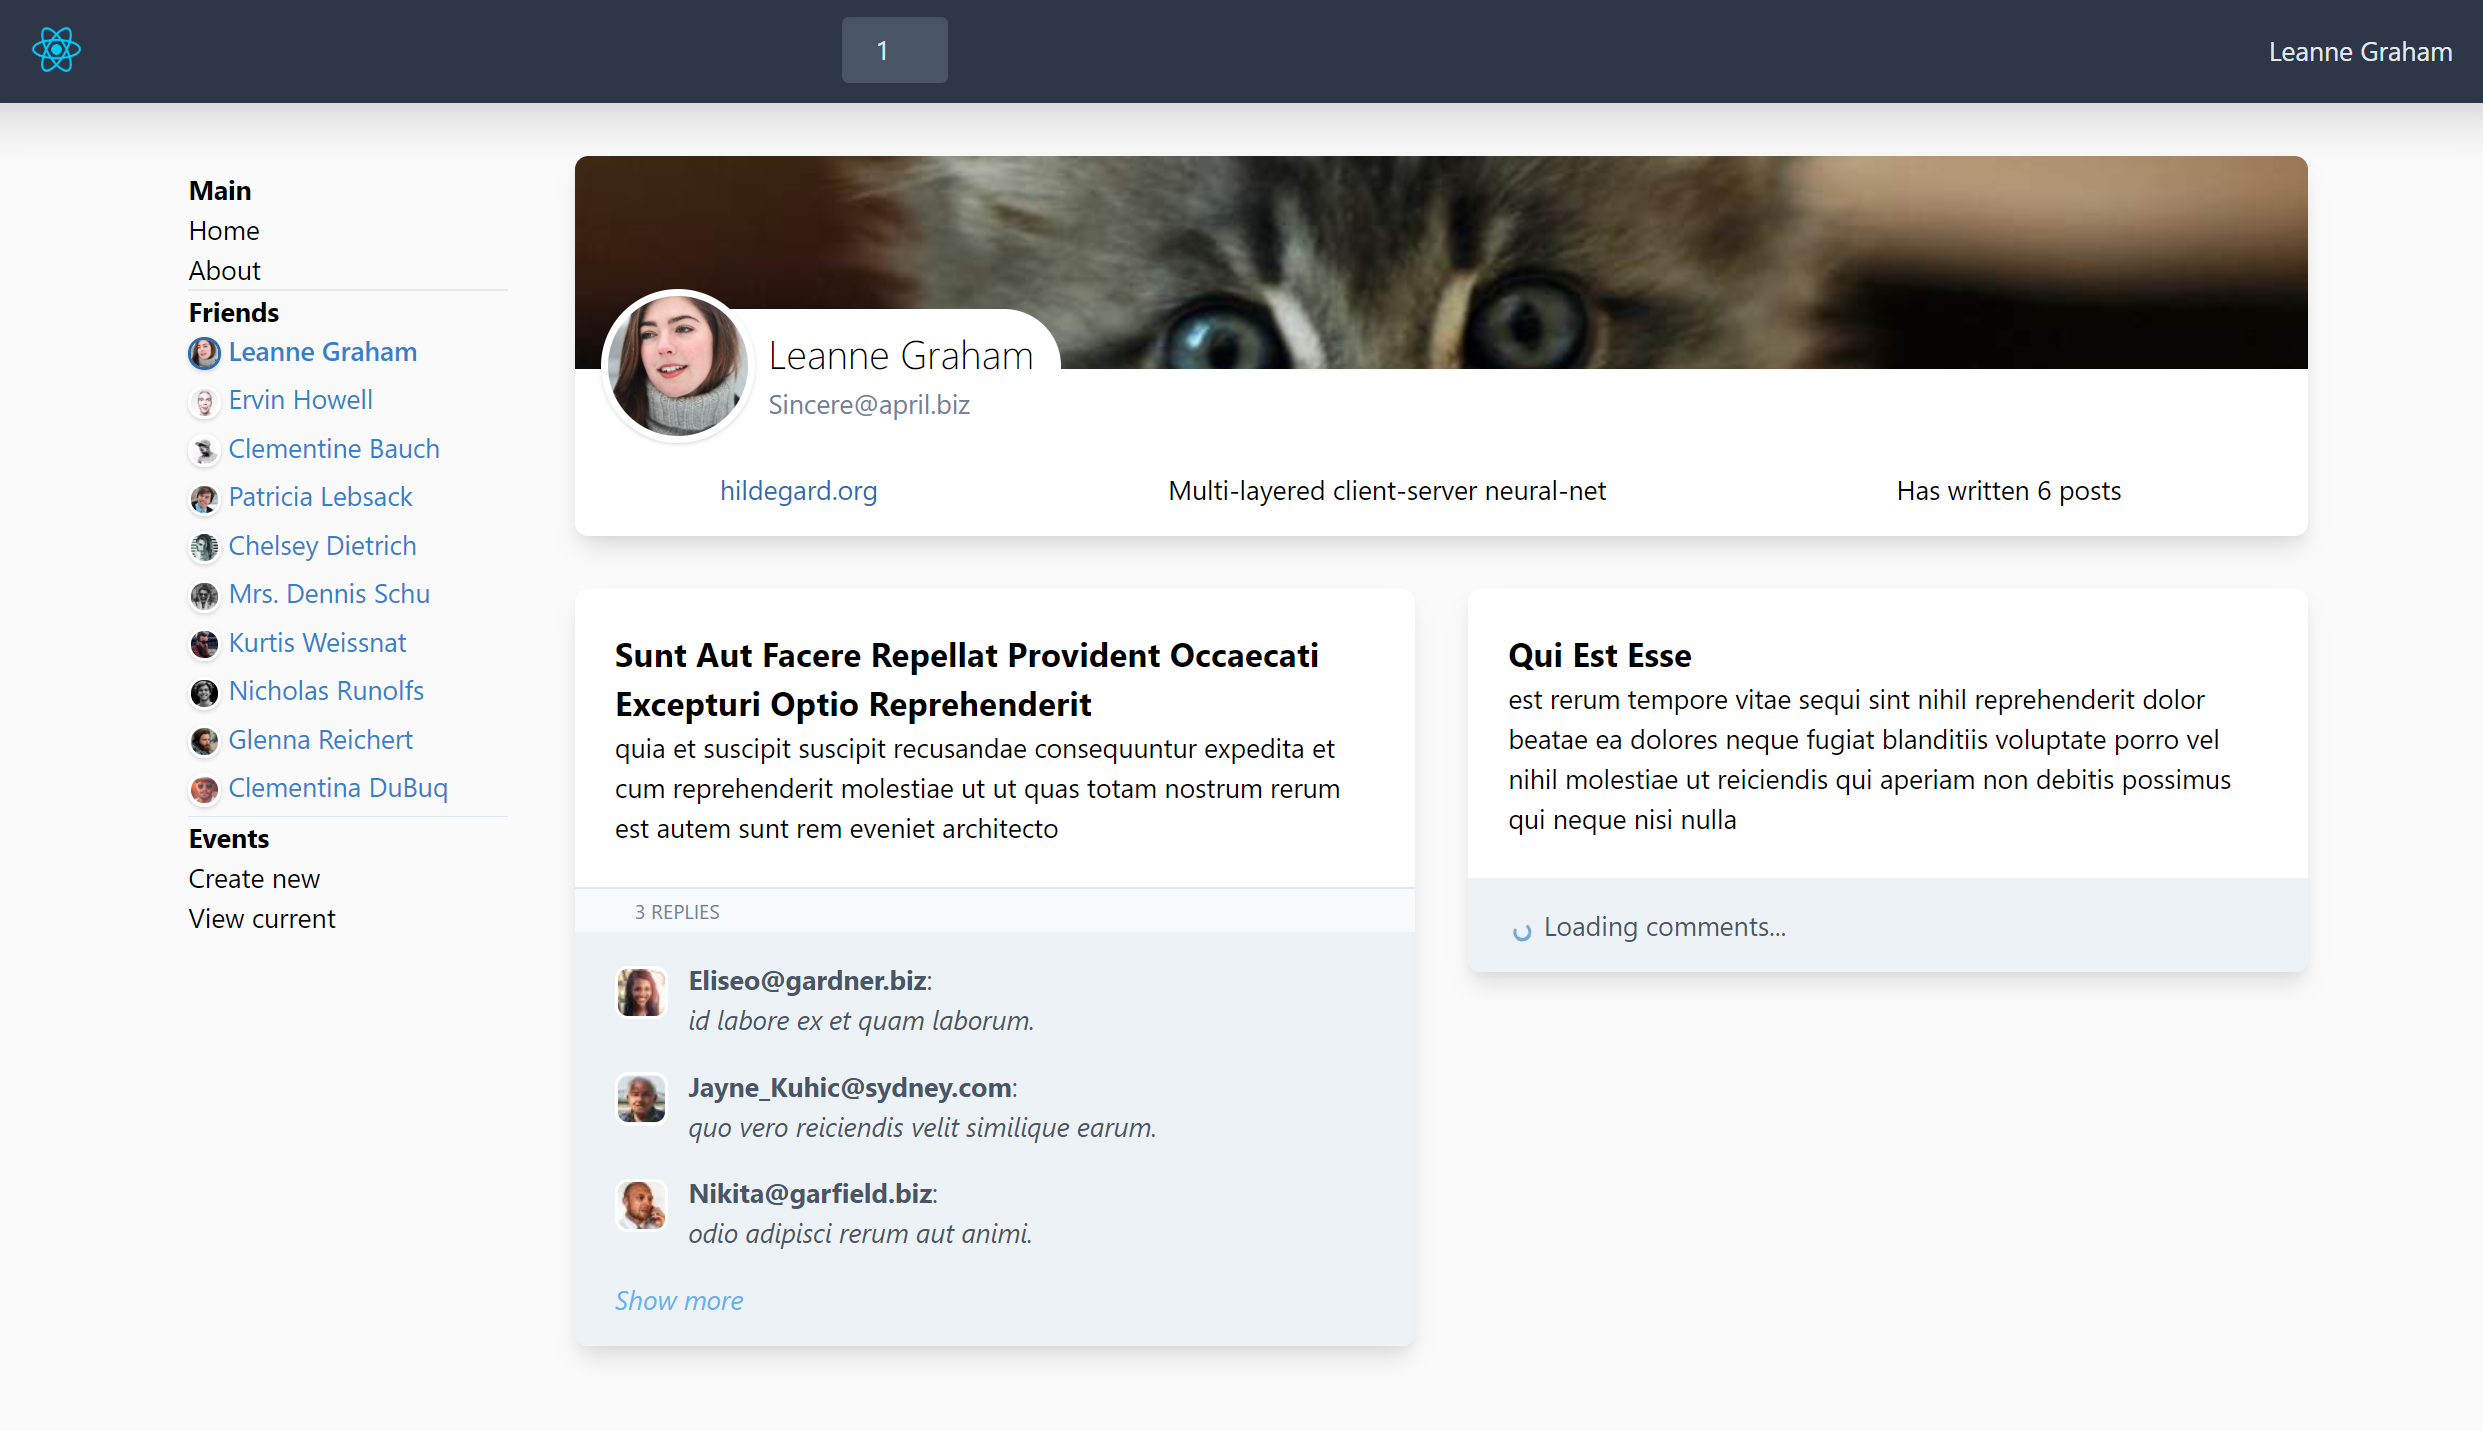
For the purposes of this simulation, imagine that a user’s posts come back before the user’s profile information. Because of how we’ve placed our Suspense boundaries, we will never show them before the user profile. This helps keep the end-user’s attention from being pulled back up. We should load top-down.
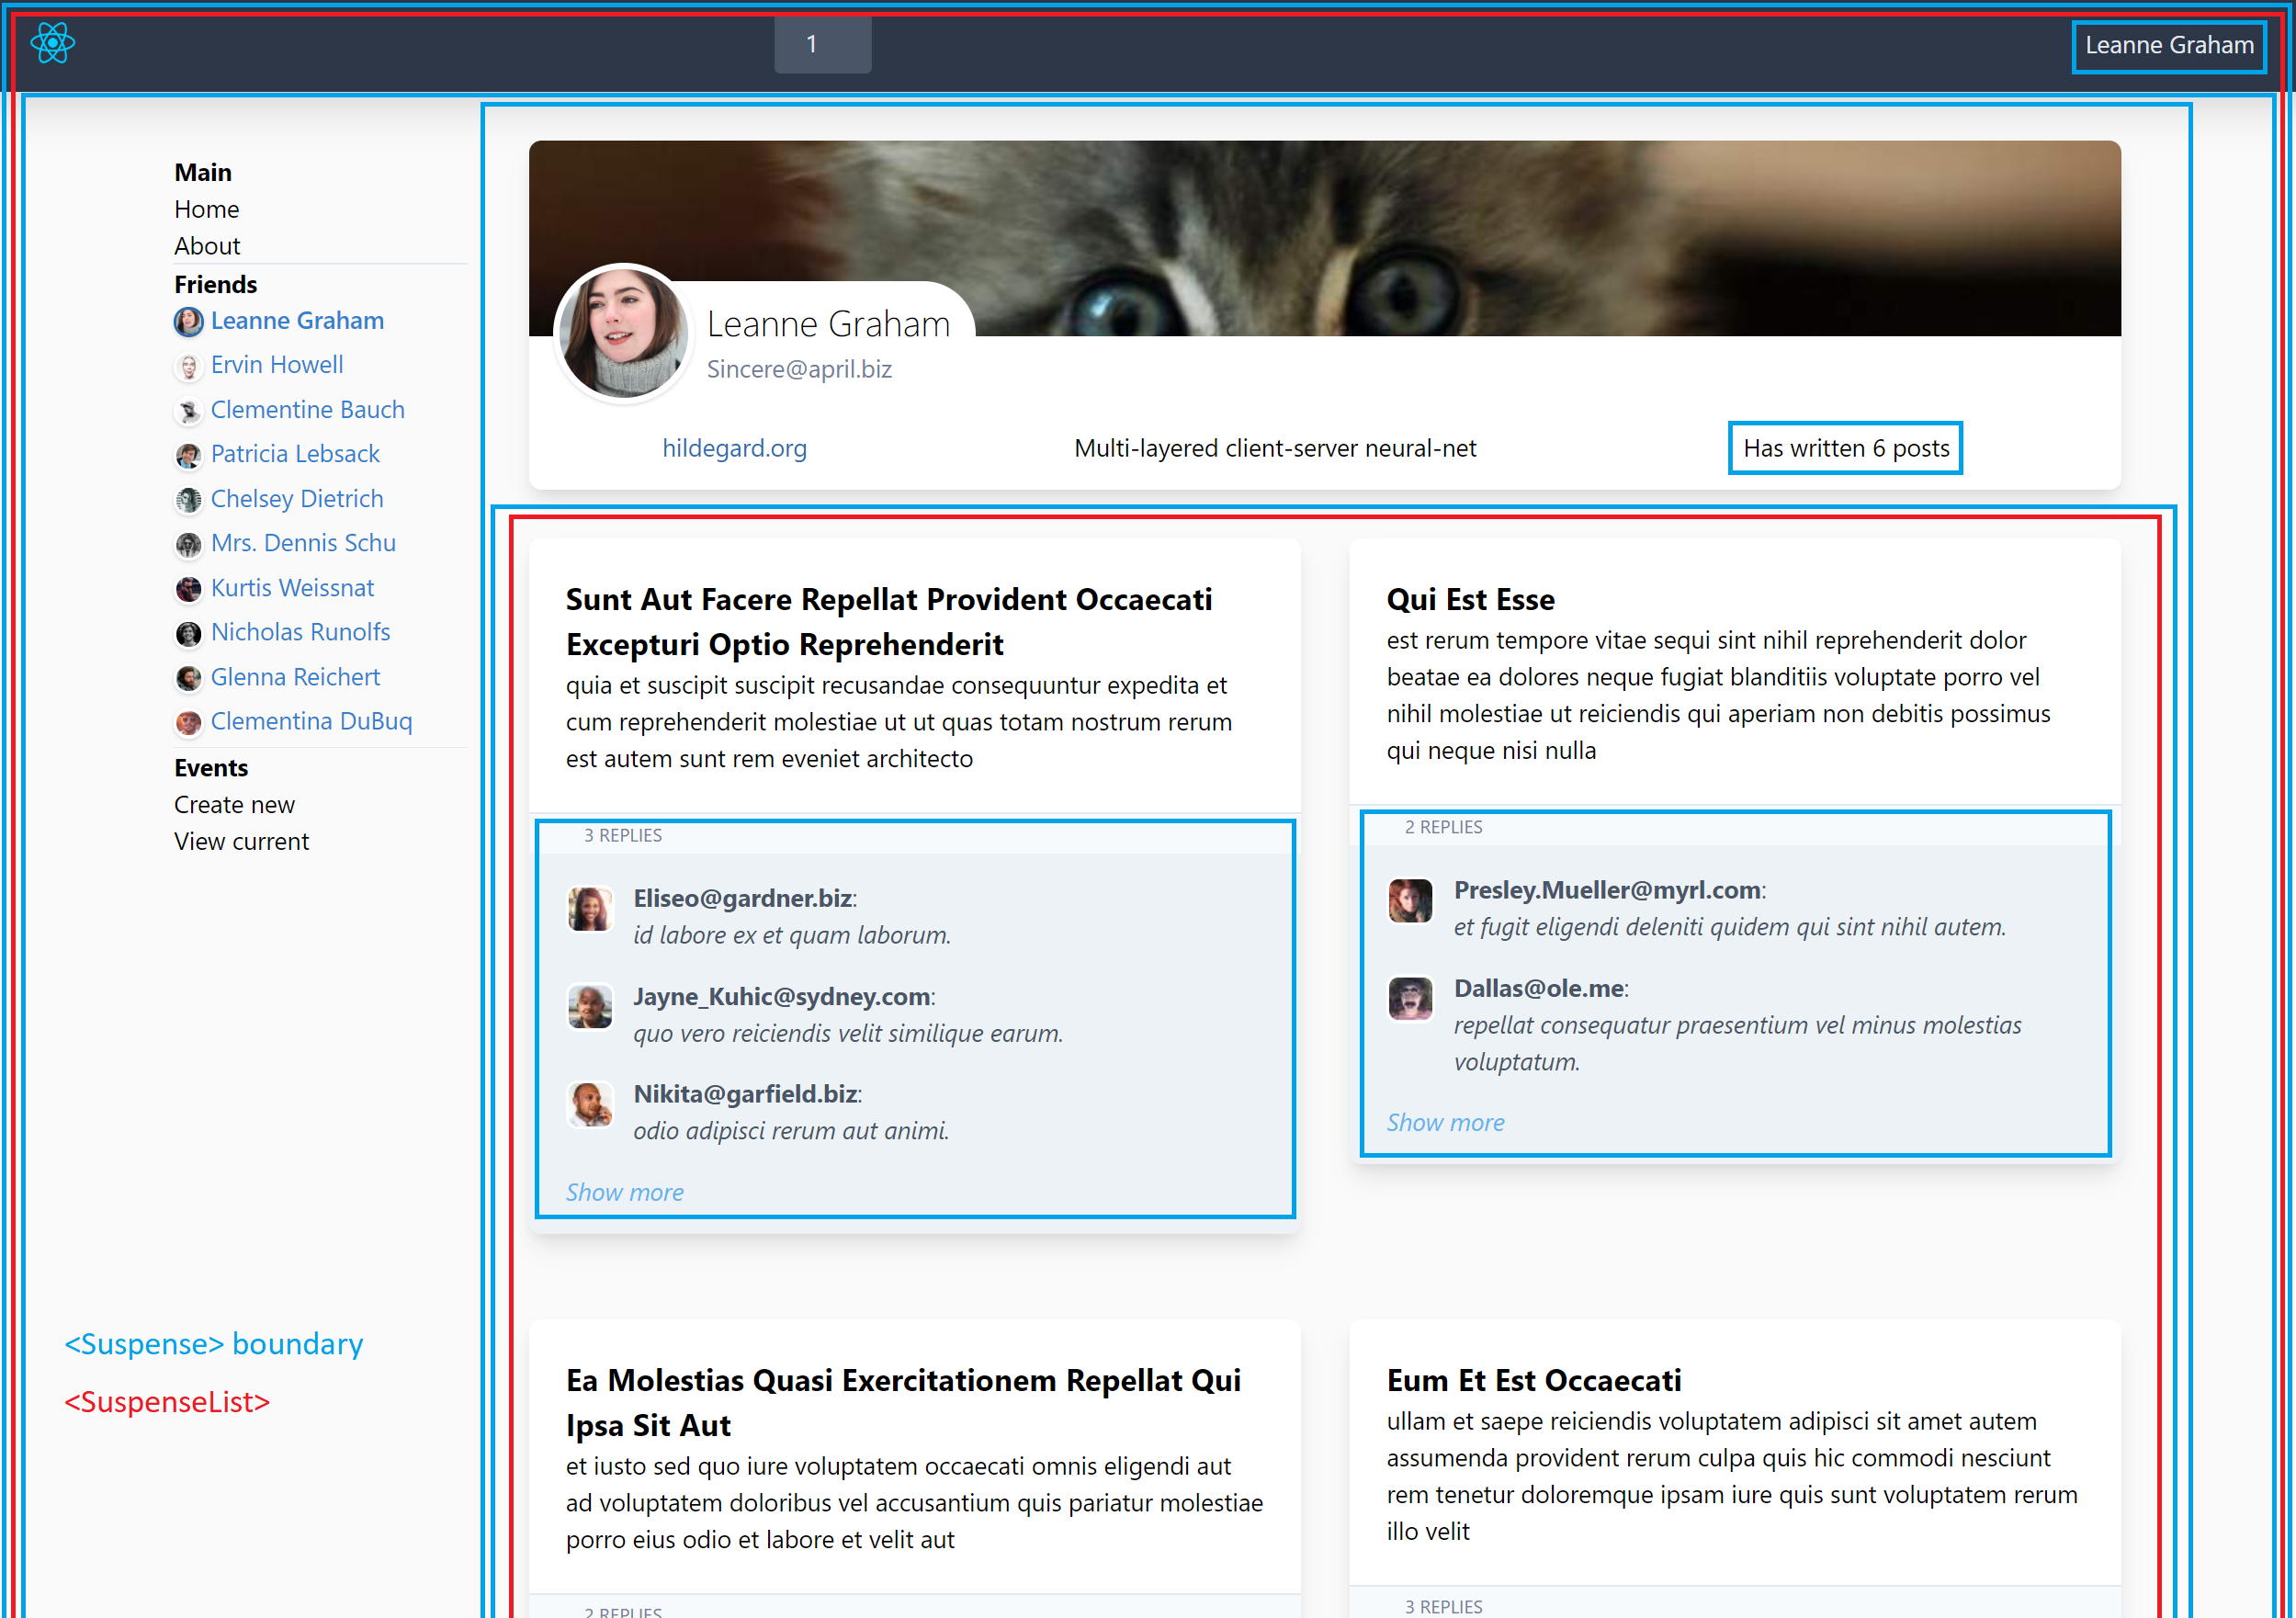
Once both the posts and user profile have loaded, and not before, we get this:
If you have a keen-eye, you might notice the “Has written 6 posts” section on the user profile. This is dynamically generated based on the posts that came back in a different network request. We actually have a Suspense boundary around this with a null fallback.
If we get the User profile information back before we get the posts, we can render the profile, and simply not show the post information. Once the posts network request comes back, we can show it.
If the user data comes in before the post, we should show that as soon as possible. But we can avoid showing any information about how many posts there are.
This is a powerful example of how Suspense has allowed us to do so much more than simply move some loaders around.
Different components can ask for lots of disparate data with unrelated response times, and display it in the way it considers best.
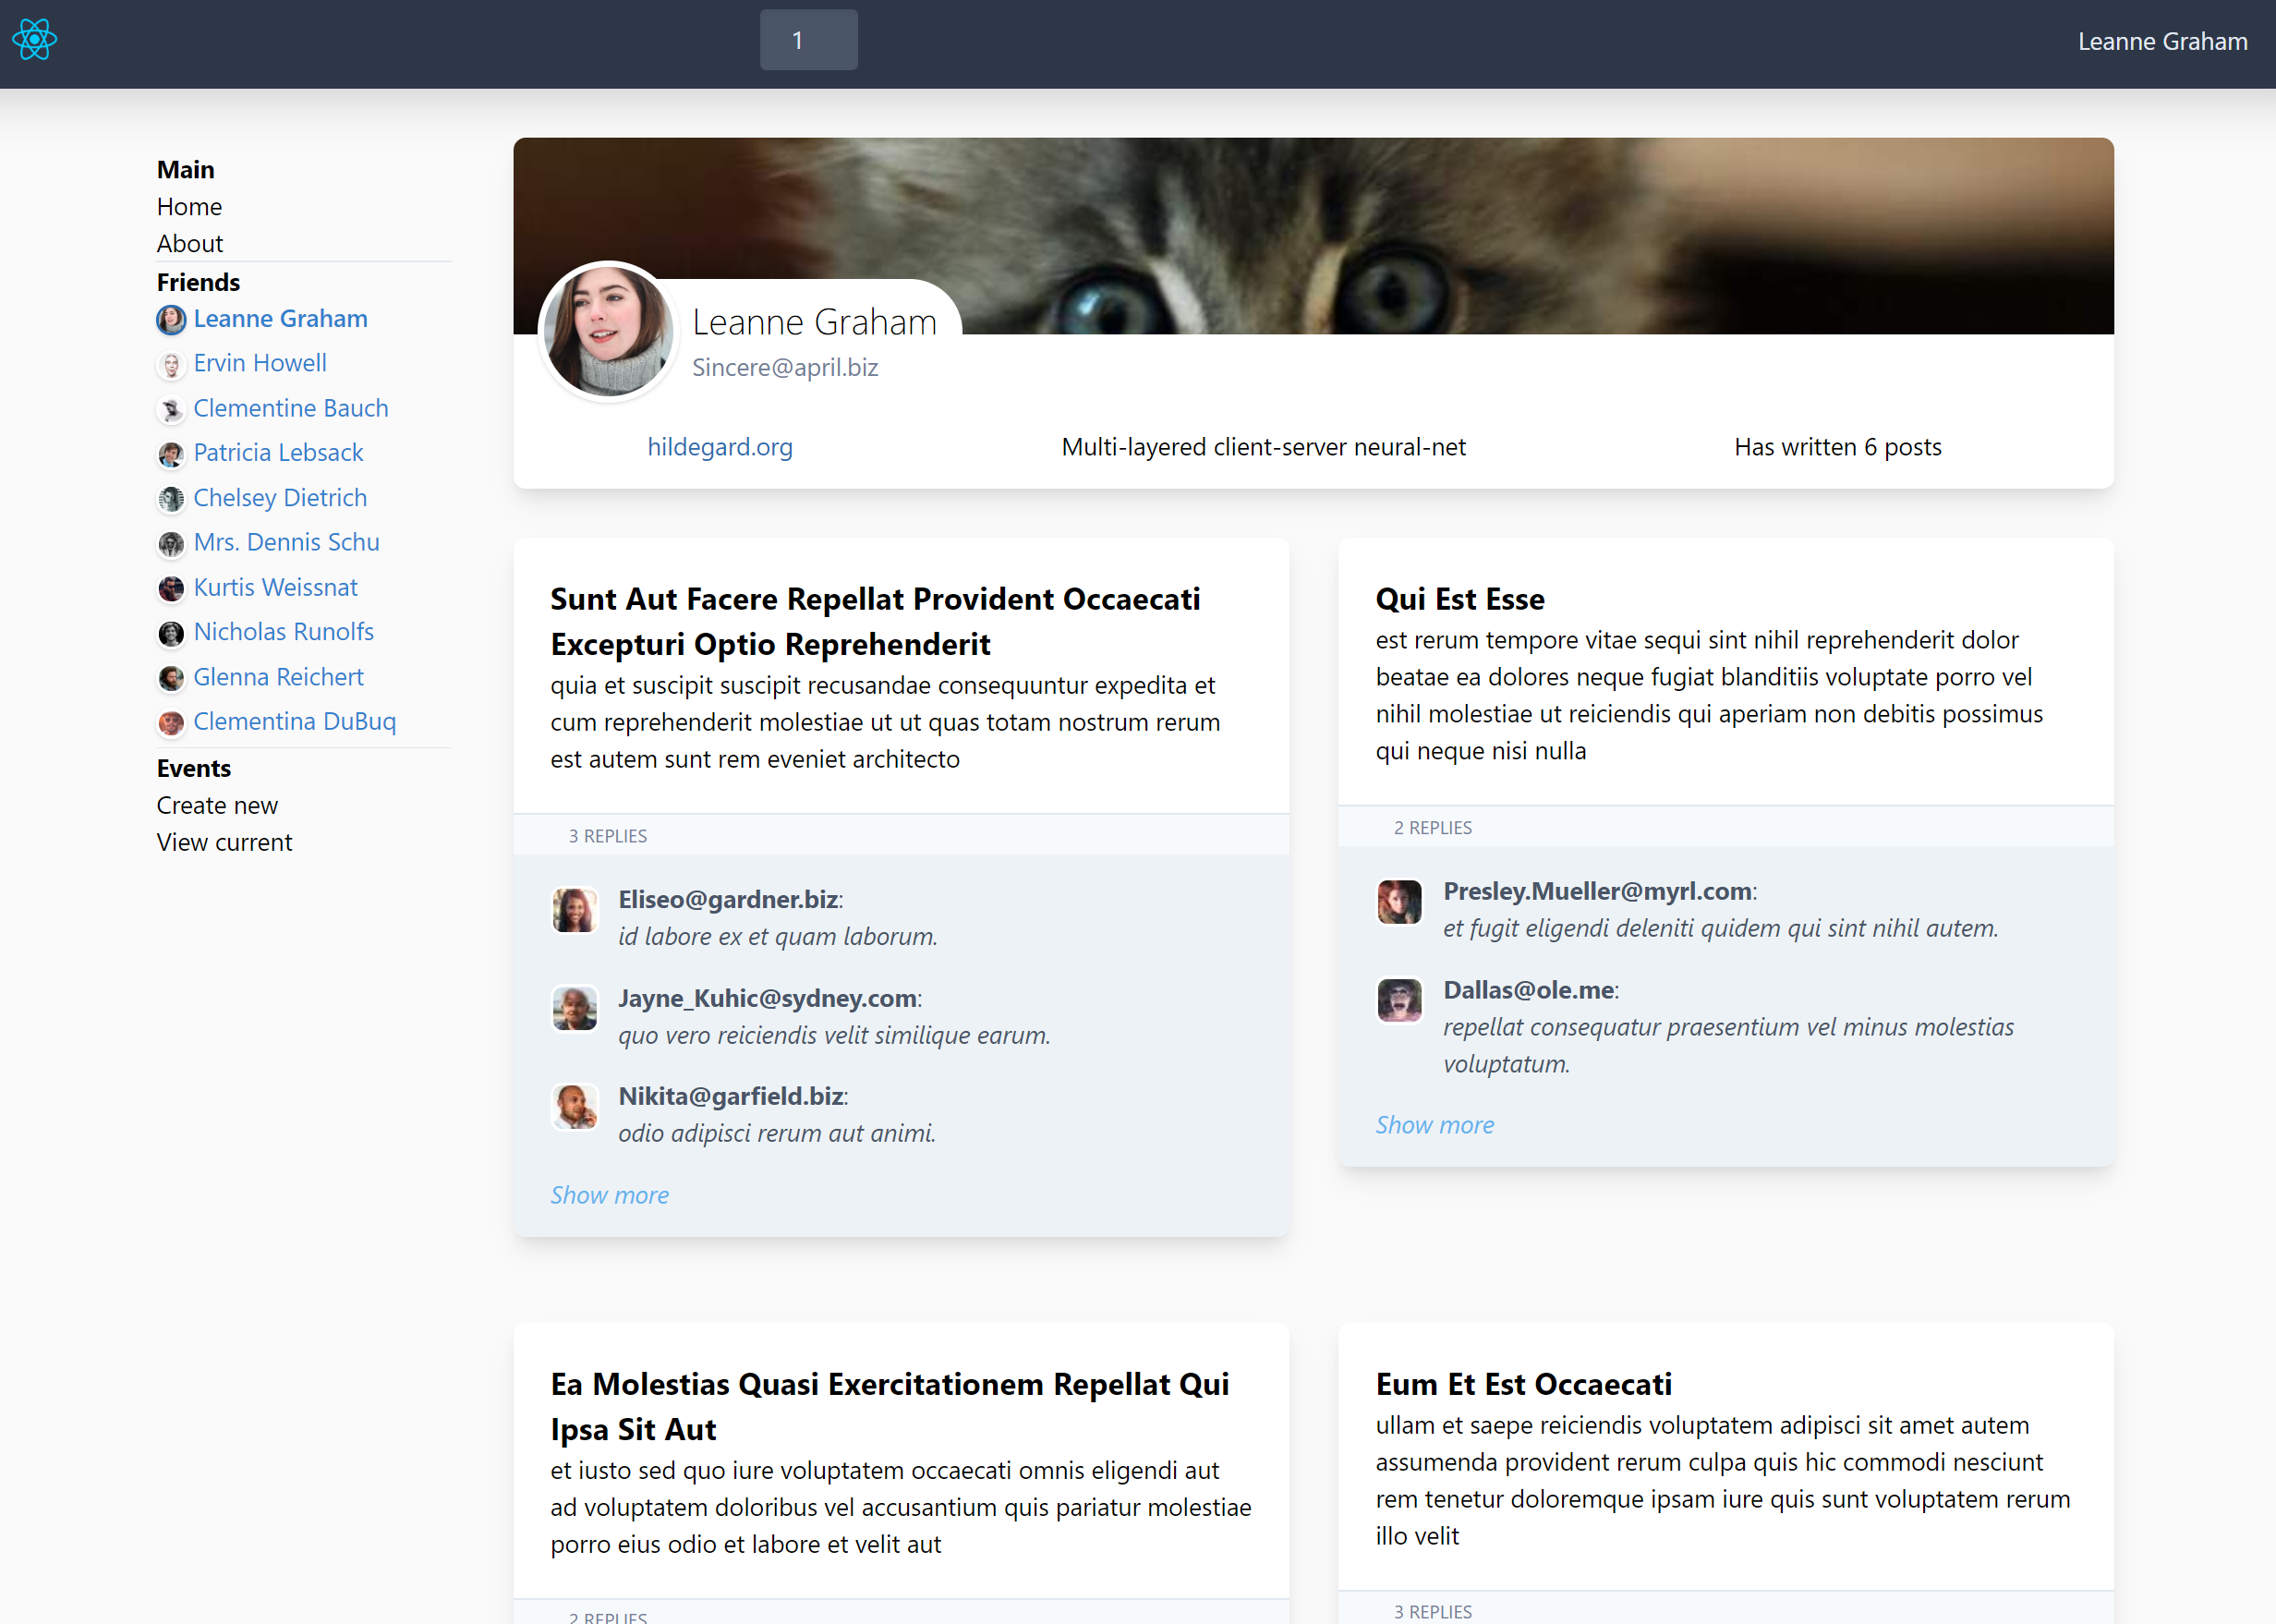
Another point to note is that one post is still loading comments. In the previous example, we would have displayed all 6 posts at once, and then the comments would appear as they’re ready. This would mean that if comments for a previous post came in while you were reading a later one, the page would shift and you’d lose what you were looking at.
Using the powerful <SuspenseList> component, in this example we’ve coordinated posts to fully render two at a time. If either of the first two posts are loading comments, we simply won’t show any posts below.
Once these comments are ready to display, we’ll shown them, AND all posts below, along with their comments (if they’ve loaded yet.)
We’ve fully loaded everything, in a consistent and predictable order.
.
A quick breakdown of Suspense locations 🔦
Blue is for Suspense, Red for SuspenseList. The entire app has a Suspense boundary followed by a SuspenseList boundary.
Imagine every bit of dynamic data here, including the images[2], as something that can say “I’m not ready yet.” If this happens, and React has decided it’s waited long enough, it will find the closest blue rectangle it is in, and tell that rectangle to show its fallback.
With the red rectangles, the SuspenseLists, it ensures that all inner Suspense boundaries visually appear each other, one by one.
Please play with the source code for this example, and see what’s possible with Suspense and Concurrent Mode. The source code is highly annotated, but if it’s confusing, that’s fine — these are brand new concepts, and this is a highly complex application to showcase it.
Getting data into dynamic web applications has always been a difficult task. Even with data loading libraries like Relay, Apollo, Redux, whatever you use — displaying that data in a consistent manner has been historically awkward.
Suspense and Concurrent mode for React change all of that in a huge way. I’m excited to see how it improves the web, and inspires other UI libraries and frameworks to improve going forward.
The part that excites me most about this however, is how easy and natural it feels to use. You get a much better developer and user experience straight out of the box.
2.
Right now, a regular <img> tag will not coordinate with Suspense, and may
pop in later. You’ll need a custom componenet to suspend image loading for
you, such as
this example
from Jared Palmer.